 Beanmapper
Library for converting from one Java class to a dissimilar Java class
with similar attribute names based on the Bean convention
About BeanMapper
Beanmapper is a Java library for mapping dissimilar Java classes with similar attribute names. The use cases for Beanmapper are the following:
- mapping from forms to entities, because:
- for security reasons you want to accept only a limited number of fields as input
- the form fields are simplified to support frontend processing
- mapping from entities to results, because:
- you want to simplify the result for frontend processing
- you want to expose a limited number of fields for security reasons
BeanMapper does not transform your objects. It copies all the values of the fields from an object to another object. You can configure the way BeanMapper should match the fields with annotations. However BeanMapper does have a lot more functionality than only converting Java classes.
You can read about this in the rest of the documentation.
What Beanmapper is not for?
Beanmapper is not a library for deep-copying classes. Whenever Beanmapper can get away with a shallow copy, it will do so. Deep-copying is reserved for dissimilar classes.
Using Spring?
Take a look at BeanMapper-Spring for combining the power of BeanMapper together with Spring. Scroll down to the REST examples for usage with BeanMapper-Spring.
Take a look at the BeanMapper-Petshop for samples of using BeanMapper. It shows you how to use the BeanMapper in a REST API in Java. It also show examples of using BeanMapper in combination with BeanMapper-Spring. All examples shown in this documentation are based on this example project.
Why using BeanMapper?
- The Entity; The entity represents the data inside the application.
- The Result; The result represents the entity to the outside of the world. This could be a partially entity.
- The Form; When creating/updating a entity you often want to use a form object to pass the given data to.
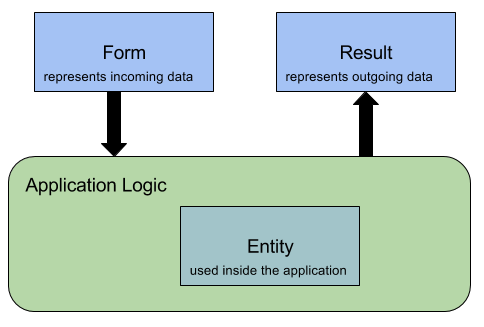
Why use forms?
- For security reasons, you may want to accept only a controlled number of fields
- For convenience, to disregard redundant or disallowed fields passed by the frontend
Why use results?
- For security, you may want to expose a controlled number of fields
- For convenience, to simplify the frontend processing of the result
When using these three kinds of objects you want to convert incoming data to your entity. You also want to convert your entity to a result when representing data to the outside. These conversions will cost a lot of unnecessary code.
Wouldn't it be great if mapping from Form to Entity and from Entity to Result can be done automatically?
Let us suppose we have a tool that is able to map similar fields from dissimilar classes. In this case, it would be just a matter of passing both instances and delegating the task of mapping from source to target to this tool. This is why you should use BeanMapper; BeanMapper just does the above described problem in a very easy way.
Want to use BeanMapper? In the next section you can read about using BeanMapper.
For a more detailed use case of why using BeanMapper, read this blog The Case for BeanMapper.
How to Use
- convert to a new class
- convert to an existing instance
- convert to a collection
- convert to a dynamic generated class
Below a basic sample of each way of converting. These samples only show a basic conversion. You should take a look at the rest of the documentation if you want to map some different fields or if you want to map a different structure.
Lets assume that we have two classes. SourceClass is your entity that is used inside the application. TargetClass is the class that you would like to expose to the outside.
public class Source {
    public Long id;
    public String name;
    public Integer age;

    public Source(Long id, String name, Integer age) {
        this.id = id;
        this.name = name;
        this.age = age;
    }
}

public class Target {
    public String name;
    public Integer age;
}
Map to a new class
Mapping to a new class does first create an instance of the given target class. Then BeanMapper uses the map to existing instance strategy to map the source to the created class instance. Take a look at BeanConstruct if you do not have a non-args constructor.
Source source = new Source(1L, "Henk", 42);

Target target = new BeanMapperBuilder().build()
    .map(source, Target.class);

assertEquals("Henk", target.name);
assertEquals(42, target.age, 0);
Map to an existing instance
Use this method if you want to override a instance with another instance. The values of the target instance are overwritten by the given source instance. Fields are mapped base on the name of the field and based on bean conventions. BeanMapper only maps fields when a field name in the source instance matches a field name in the target instance.
With annotations you have a lot more possibilities to map classes, take a look on the list below:
| BeanIgnore | Use this when you explicitly do not want to map a field. |
|---|---|
| BeanProperty | Use this when you want to map fields that have no matching field names. |
| BeanDefault | Use this when you want to set a default value when the mapped value is null. |
| BeanCollection | Use this when you want to map a field of type Collection. |
Source source = new Source(1L, "Henk", 42);

Target target = new BeanMapperBuilder().build()
    .map(source, Target.class);

assertEquals("Henk", target.name);
assertEquals(42, target.age, 0);
Map to a collection
Use this method when you want to map a collection of items to a collection of items of an other type. Of course you can do this for yourself by creating a loop and call map inside each loop. This method is just to make it easy for you. You can also pass a third optional argument to convert the list to. In this case we choose an ArrayList.class.
List<Source> sources = new ArrayList<Source>();
sources.add(new Source(1L, "Henk", 42));
sources.add(new Source(2L, "Piet", 50));
sources.add(new Source(3L, "Kees", 3));

ArrayList<Target> targets = (ArrayList<Target>) new BeanMapperBuilder().build()
    .map(sources, Target.class, ArrayList.class);

assertEquals(3, targets.size(), 0);
assertEquals("Henk", targets.get(0).name);
assertEquals("Piet", targets.get(1).name);
assertEquals("Kees", targets.get(2).name);
Convert to a dynamic generated class
This method consist of two different ways:
- Map only a few fields of the source class over the existing target instance.
- Map to a new target instance and restrict this target instance to contain only the given fields.
Both methods does use javassist to create a new class.
The first option is called 'downsizeSource'. This method generates a new class based on the source class but only with the fields you want to map. BeanMapper uses the generated class to map over the existing given target instance. The result is that you have mapped only a few fields from the source over the target instance. Use case for this method is for example a PATCH request.
The second options is called 'downsizeTarget'. With this option you can expose a few fields of the source class to the outside. BeanMapper generates a new class based on the given target class but only with the fields you want to exist in the target. The use case for 'downsize' is to produce a class that physically contains no other fields to expose; what you see is what you get. It can be equally well transformed into for example XML or JSON, without format-specific mapping.
Below examples of both options.
// Option 1: downsizeSource
BeanMapper beanMapper = new BeanMapperBuilder().build();
Source source = new Source(1L, "Henk", 42);
Target target = new Target("Piet", 12);

beanMapper.wrapConfig()
    .downsizeSource(Arrays.asList("age"))
    .build()
    .map(source, target);

assertEquals("Piet", target.name);
assertEquals(42, target.age, 0);

// Option 2: downsizeTarget
BeanMapper beanMapper = new BeanMapperBuilder().build();
Source source = new Source(1L, "Henk", 42);

Object target = beanMapper.wrapConfig()
    .downsizeTarget(Arrays.asList("name"))
    .build()
    .map(source, Target.class);

String json = new ObjectMapper().writeValueAsString(target);
assertEquals("{\"name\":\"Henk\"}", json);
Strict mapping
BeanMapper has two inherent means to help you verify that beans can be mapped. One is explicit and fail-fast, the other is implicit and triggers right before mapping.
Option 1 is to explicitly map the pairs with a strict side. When a BeanMapper bean is created (using the build method of the BeanMapperBuilder), it will validate all registered bean pairs. When strict sides do not have matching properties on the other side, an exception is thrown. This will disrupt the boot sequence.
There are two ways to do this:
- @BeanMapToClass / @BeanMapFromClass; annotate relevant classes with their counterparts. The annotated classes will be considered strict. The other side must provide matching properties. This option is only available if you use Spring Boot.
- addBeanPair; use the BeanMapperBuilder methods addBeanPairWithStrictSource and addBeanPairWithStrictTarget. This will act in exactly the same way as using the annotations and can be used if you are not using Spring Boot.
Option 2 works on the convention that incoming Data Transfer Objects are called *Form and outgoing Data Transfer Objects are called *Result. Whenever a *Form in a source spot, or a *Result in a target spot does not have matching properties, an exception is thrown. The exception is not thrown until the mapping is about to take place. Feedback is slow to materialize.
The process can be disabled by setting setApplyStrictMappingConvention to false.
Spring Boot
If you use Spring Boot, you only have to include is the Spring Boot starter dependency. The starter will take care of registering the right converters and bean pairs. It will offer an immediate BeanMapper for you to auto-wire.
    <dependency>
        <groupId>io.beanmapper</groupId>
        <artifactId>beanmapper-spring-boot-starter</artifactId>
        <version>2.3.0</version>
    </dependency>
Download
In order to use Beanmapper in your project, simple add the following Maven dependency.
<dependency>
    <groupId>io.beanmapper</groupId>
    <artifactId>beanmapper</artifactId>
    <version>{{version}}</version>
</dependency>
Version is the latest version of BeanMapper
![]()
You can find the javadoc for BeanMapper here.
You can also download the latest jar and include this in your project.
BeanMapper Builder
BeanMapper mapper = new BeanMapperBuilder().build()
The configuration of this mapper is editable by using the config() method of the BeanMapper instance.
This method returns a BeanMapperBuilder to edit the configuration of BeanMapper for all mappings.
In the example below we add a converter to the created BeanMapper.
This converter is applied during all mappings with this instance of BeanMapper.
mapper = mapper.config()
            .addConverter(converter)
            .build();
You can also configure BeanMapper for one mapping only.
In this case you should use the method wrapConfig() of the instance of BeanMapper followed by the map() method for mapping an instance.
The given converter is applied only during this mapping from source to target.
mapper.wrapConfig()
          .addConverter(converter)
          .build()
          .map(source, target);
With BeanMapperBuilder you can configure your own BeanMapper in the way you wanted it. For example: you can add converters, configure the way to initialize classes, configure the way to unproxy a class or already set the target instance for mapping.
@BeanProperty
| Annotation | @BeanProperty |
|---|---|
| Arguments | name: the name that matches the field name on the other side |
| Description | Use BeanProperty if the field name does not match the other field name. You can use this annotation on both sides. |
| Exceptions | BeanNoSuchPropertyException is thrown when BeanMapper can not find a field with the given name |
public class Source {
    public Long id;
    public String name;
    @BeanProperty(name = "otherAge")
    public Integer age;
}
public class Target {
    @BeanProperty(name = "name")
    public String otherName;
    public Integer otherAge;
}
Source source = new Source(1L, "Henk", 42);
Target target = new BeanMapperBuilder().build()
    .map(source, Target.class);

assertEquals("Henk", target.otherName);
assertEquals(42, target.otherAge, 0);
@BeanIgnore
| Annotation | @BeanIgnore |
|---|---|
| Arguments | None |
| Description | Use BeanIgnore when you explicitly don't want to map a field. You can use this annotation on both sides. |
public class Source {
    public Long id;
    public String name;
    @BeanIgnore
    public Integer age;
}
public class Target {
    @BeanIgnore
    public String name;
    public Integer age;
}
Source source = new Source(1L, "Henk", 42);
Target target = new BeanMapperBuilder().build()
    .map(source, Target.class);

assertNull(target.name);
assertNull(target.age);
@BeanDefault
| Annotation | @BeanDefault |
|---|---|
| Arguments | Value: the default value for the field if the mapped value is null |
| Description | Use BeanDefault when you want to set a default value when the mapped value is null. You can use this annotation on both sides. |
public class Source {
    public Long id;
    public String name;
    @BeanDefault("5")
    public Integer age;
}
public class Target {
    @BeanDefault("Henk")
    public String name;
    public Integer age;
}
Source source = new Source(null, null, null);
Target target = new BeanMapperBuilder()
    .build()
    .map(source, Target.class);

assertEquals(5, target.age, 0);
assertEquals("Henk", target.name);
@BeanCollection
| Annotation | @BeanCollection |
|---|---|
| Arguments |
|
| Description |
Use BeanCollection when you want to map a field of type Collection. If the BeanCollection annotation is not set, BeanMapper will try to determine the element type by checking the generic parameter type of the target collection. Therefore using the annotation is optional, mapping will always take place. Note that the collection instructions will be merged from both target and source side. BeanMapper prefers settings on the target side to settings on the source side. |
public class Person {
    public Long id;
    public String name;
    public Integer age;

    public Person(Long id, String name, Integer age) {
        this.id = id;
        this.name = name;
        this.age = age;
    }
}
public class PersonResult {
    public String name;
    public Integer age;

    public PersonResult() {
    }

    public PersonResult(String name, Integer age) {
        this.name = name;
        this.age = age;
    }
}
BeanCollectionUsage.CONSTRUCT
With this example we map to list using @BeanCollection with bean collection usage set to always reconstruct the target collection.
public class Source {
    public Set<Person> items;
}

public class Target {
    @BeanCollection(elementType = PersonResult.class,
      beanCollectionUsage = BeanCollectionUsage.CONSTRUCT)
    public List<PersonResult> items;
}
Source source = new Source();
source.items = new LinkedHashSet<Person>();
source.items.add(new Person(1L, "Henk", 42));
source.items.add(new Person(2L, "Piet", 18));
source.items.add(new Person(3L, "Gijs", 67));

Target target = new Target();
target.items = new ArrayList<PersonResult>();
target.items.add(new PersonResult("Kees", 13));
target.items.add(new PersonResult("Klaas", 24));

Target result = new BeanMapperBuilder().build()
    .map(source, target);

assertEquals(3, result.items.size(), 0);
assertEquals("Henk", result.items.get(0).name);
assertEquals("Piet", result.items.get(1).name);
assertEquals("Gijs", result.items.get(2).name);
BeanCollectionUsage.REUSE
With this example we map to list using @BeanCollection with bean collection usage set to reuse the target collection.
public class Source {
    public Set<Person> items;
}

public class Target {
    @BeanCollection(elementType = PersonResult.class,
      beanCollectionUsage = BeanCollectionUsage.REUSE)
    public List<PersonResult> items;
}
Source source = new Source();
source.items = new LinkedHashSet<Person>();
source.items.add(new Person(1L, "Henk", 42));
source.items.add(new Person(2L, "Piet", 18));
source.items.add(new Person(3L, "Gijs", 67));

Target target = new Target();
target.items = new ArrayList<PersonResult>();
target.items.add(new PersonResult("Kees", 13));
target.items.add(new PersonResult("Klaas", 24));

Target result = new BeanMapperBuilder().build()
    .map(source, target);

assertEquals(5, result.items.size(), 0);
assertEquals("Kees", result.items.get(0).name);
assertEquals("Klaas", result.items.get(1).name);
assertEquals("Henk", result.items.get(2).name);
assertEquals("Piet", result.items.get(3).name);
assertEquals("Gijs", result.items.get(4).name);
BeanCollectionUsage.CLEAR
With this example we map to list using @BeanCollection with bean collection usage set to clear the collection before mapping.
public class Source {
    public Set<Person> items;
}

public class Target {
    @BeanCollection(elementType = PersonResult.class,
      beanCollectionUsage = BeanCollectionUsage.CLEAR)
    public List<PersonResult> items;
}
Source source = new Source();
source.items = new LinkedHashSet<Person>();
source.items.add(new Person(1L, "Henk", 42));
source.items.add(new Person(2L, "Piet", 18));
source.items.add(new Person(3L, "Gijs", 67));

TargetWithClear target = new TargetWithClear();
target.items = new ArrayList<PersonResult>();
target.items.add(new PersonResult("Kees", 13));
target.items.add(new PersonResult("Klaas", 24));

TargetWithClear result = new BeanMapperBuilder().build()
    .map(source, target);

assertEquals(3, result.items.size(), 0);
assertEquals("Henk", result.items.get(0).name);
assertEquals("Piet", result.items.get(1).name);
assertEquals("Gijs", result.items.get(2).name);
@BeanConstruct
| Annotation | @BeanConstruct |
|---|---|
| Arguments | Value: string array with the names of the fields that must be passed in the target constructor |
| Description | Use BeanConstruct when you want to map a to a class without a no-args constructor. BeanConstruct uses his arguments to get the field values from the source class and pass these arguments to the target class constructor. You can use this annotation on both sides. However only BeanConstruct on the target side makes sense because that object has to be created. |
| Exceptions | BeanConstructException is thrown when no valid constructor can be found. BeanInstantiationException is thrown when BeanMapper cannot intiantate the target class. |
public class Person {
    public Long id;
    public String firstName;
    public String prefix;
    public String lastName;

    public Person(Long id, String firstName, String prefix, String lastName) {
        this.id = id;
        this.firstName = firstName;
        this.prefix = prefix;
        this.lastName = lastName;
    }
}
@BeanConstruct({"firstName", "prefix", "lastName"})
public class PersonResult {
    public String fullName;

    public PersonResult(String name1, String name2, String name3) {
        this.fullName = name1 + " " + name2 + " " + name3;
    }
}
Person person = new Person(1L, "Henk", "de", "Vries");

PersonResult target = new BeanMapperBuilder().build()
    .map(person, PersonResult.class);

assertEquals("Henk de Vries", target.fullName);
@BeanAlias
| Annotation | @BeanAlias |
|---|---|
| Arguments | Value: the name under which the field must be available |
| Description | Use BeanAlias when want to make a field available under a given name during the mapping process. This can be useful when using fields on a different level in BeanConstruct. This annotations can be used only at source side because you can make fields available from the source with another name for the target. BeanAlias differs from BeanProperty because BeanProperty is only available on the level where the field exist where BeanAlias is available on all mapping levels. |
public class Source {
    public Long id;
    @BeanAlias("otherName")
    public String name;

    public Source(Long id, String name) {
        this.id = id;
        this.name = name;
    }
}
public class Target {
    public String otherName;
}
Source source = new Source(1L, "Henk");

Target target = new BeanMapperBuilder().build()
        .map(source, Target.class);

assertEquals("Henk", target.otherName);
@BeanRoleSecured
| Annotation | @BeanRoleSecured |
|---|---|
| Arguments | Value: one or more roles |
| Description |
Use BeanDefault when you want to BeanMapper to check whether the property may be copied from source to target. BeanMapper will query its attached RoleSecuredCheck instance to see if the security Principal has any one of the roles. If at least one role matches, the property will be mapped. If not, the property will be ignored. If the BeanMapper Spring Boot Starter is used, it will automatically register the SpringRoleSecuredCheck if an AuthenticationManager is found. When @BeanRoleSecured is used, but no RoleSecuredCheck has been attached, BeanMapper will throw an exception, unless enforceSecuredProperties is false. |
    @BeanRoleSecured("MANAGE_BSN")
    public String bsn;
    @BeanRoleSecured("MANAGE_BSN")
    public String getBsn() {
        return this.bsn;
    };
@BeanLogicSecured
| Annotation | @BeanLogicSecured |
|---|---|
| Arguments | Value: a LogicSecuredCheck implementation |
| Description |
Use BeanLogicSecured if you care to have BeanMapper query the attached LogicSecuredCheck to determine if the mapping may take place. If allowed, the property will be mapped. If not, the property will be ignored. If the BeanMapper Spring Boot Starter is used, it will automatically register the LogicSecuredCheck classes if an AuthenticationManager is found. When @BeanLogicSecured is used, but its LogicSecuredCheck class cannot be found, BeanMapper will throw an exception, unless enforceSecuredProperties is false. |
    @BeanLogicSecured(EmployeeIsOwnerOrMayReadBSNCheck.class)
    public String bsn;
A class implementing LogicSecuredCheck will have to be implemented, clearly stating the datatypes of the source and target classes. Tip: only specify the side you are using for the check and keep the other as Object. BeanMapper will call on the class passing both the source and the target instances.
If the class extends from AbstractSpringSecuredCheck, you will have access to hasRole() and getUserDetails().
    public class EmployeeIsOwnerOrMayReadBSNCheck
            extends AbstractSpringSecuredCheck
            implements LogicSecuredCheck {

        @Override
        public boolean isAllowed(Employee source, Object target) {
            return
                    hasRole(READ_PERSONAL_DETAILS_BSN) ||
                    isOwner(source);
        }

        private boolean isOwner(Employee employee) {
            return getUserDetails()
                .getUsername()
                .equals(
                    employee.getPerson().getCrowdUsername());
        }

    }
BeanConverters
A nice feature of BeanMapper is for applying custom converters. In BeanMapper you can easily add your own converter to map fields on a custom way. You can add a converter for the current mapping or apply a converter for all mappings of BeanMapper. Below you can find both examples.
BeanMapper beanMapper = new BeanMapperBuilder().addConverter(converter).build();
// Use this BeanMapper for your mappings and your converter is applied
beanMapper.map(source, target);

// Only during current mapping the tempConverter is applied.
beanMapper.wrapConfig()
    .addConverter(tempConverter)
    .build()
    .map(source, target);
You can easily extend the SimpleBeanConverter.class to convert between fields, you can extend the AbstractBeanConverter.class or implement the BeanConverter.class interface. Below a example from BeanMapper-Petshop which shows you how to apply a SimpleBeanConverter.
Let's assume we have a AgeCalculator.class which extends from the SimpleBeanConverter.class. The age calculator is a beanconverter between LocalDate and Integer.
public class AgeCalculator extends SimpleBeanConverter<LocalDate, Integer> {

    @Override
    public Integer doConvert(LocalDate birthDate) {
        return birthDate.until(LocalDate.now()).getYears();
    }
}
Now we map a pet to a result containing the name and the age of the pet. In this mapping the birthdate, which is a LocalDate, matches the age field which is a Integer. Because we have added a converter for these types, the converter is applied and the age is calculated.
public class Pet {
    public String nickname;
    public LocalDate birthDate;
}
public class PetNameAndAgeResult {
    public String nickname;
    @BeanProperty(name = "birthDate")
    public Integer age;
}
Pet pet = new Pet();
pet.nickname = "Loebas";
pet.birthDate = LocalDate.of(2012, 1, 1);

AgeCalculator ageCalculator = new AgeCalculator();
PetNameAndAgeResult petNameAndAgeResult = new BeanMapperBuilder()
      .addConverter(ageCalculator)
      .build()
      .map(pet, PetNameAndAgeResult.class);

assertEquals("Loebas", petNameAndAgeResult.nickname);
assertEquals(LocalDate.now().getYear()-2012, petNameAndAgeResult.age, 0);
Nested to Nested
Let's start with an example of mapping nested objects:
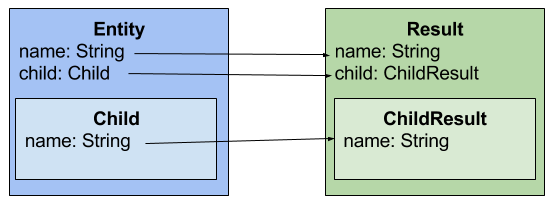
BeanMapper does support by default nested objects. Nested in this context means fields that have more fields inside. For example a pet. A pet does have a name, birthDate and a type. Type is an instance of PetType which contains an id and a name. If you want to map that pet you may also want to map the type inside the pet class. BeanMapper just do that.
To indicate which classes are mapped deeper inside, you have to set a package. All classes in the given package and sub-packages are eligible for mapping. The root source and target do not need to be set as such, because the verification is only run against nested classes which should be mapped implicitly as well. Below a example which is showing this use case.
public class Pet {
    public String nickname;
    public LocalDate birthDate;
    public PetType type;

    public Pet(String nickname, LocalDate birthDate, Long typeId, String typeName) {
        this.nickname = nickname;
        this.birthDate = birthDate;
        this.type = new PetType();
        this.type.name = typeName;
        this.type.id = typeId;
    }
}

public class PetType {
    public Long id;
    public String name;
}
public class PetResult {
    @BeanProperty(name = "nickname")
    public String name;
    public PetTypeResult type;
}

public class PetTypeResult {
    public String name;
}
Pet pet = new Pet("Loebas", LocalDate.now(), 1L, "Dog");

PetResult petResult = new BeanMapperBuilder()
        .addPackagePrefix(PetTypeResult.class)
        .build()
        .map(pet, PetResult.class);

assertEquals("Loebas", petResult.name);
// Class PetType in Pet is mapped as well to PetTypeResult
assertEquals("Dog", petResult.type.name);
Nested to Flat
In this example the objects to map does not match and does have a different structure. Below a example of this case. Take a look at the next example for mapping this example in reverse direction.
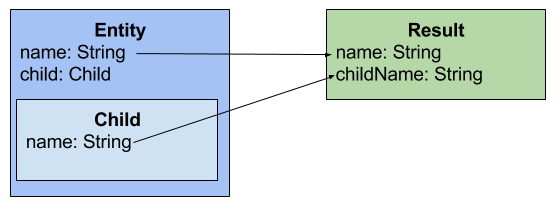
This use case comes up if you want to simplify your result to the outside. Your source object contains a nested structure of different fields. You want to simplify that object and create an object that represent this object in an easy way to the outside.
This example shows a owner of a pet. The owner does have a name and a address. The nested address object contains several fields such as street, number and city. For simplicity you want only the name and the living place of the owner in your result. With the BeanProperty annotation you can dive into objects on the other side. In this example the annotation references address.city. BeanMapper goes to the address and gets the city from it to map it to the living place in OwnerResult.class. You can dive as deep as you want with BeanProperty.
public class Owner {
    public String firstName;
    public String prefix;
    public String lastName;
    public Address address;

    public Owner(String firstName, String prefix, String lastName, Address address) {
        this.firstName = firstName;
        this.prefix = prefix;
        this.lastName = lastName;
        this.address = address;
    }
}

public class Address {
    public String street;
    public int number;
    public String city;

    public Address(String street, int number, String city) {
        this.street = street;
        this.number = number;
        this.city = city;
    }
}
public class OwnerResult {
    public String firstName;
    @BeanProperty(name = "address.city")
    public String livingPlace;
}
Address address = new Address("hondstraat", 42, "Zoetermeer");
Owner owner = new Owner("Gijs", "de", "Hond", address);
OwnerResult ownerResult = beanMapper.map(owner, OwnerResult.class);
assertEquals("Gijs de Hond", ownerResult.fullName);
assertEquals("Zoetermeer", ownerResult.livingPlace);
Flat to Nested
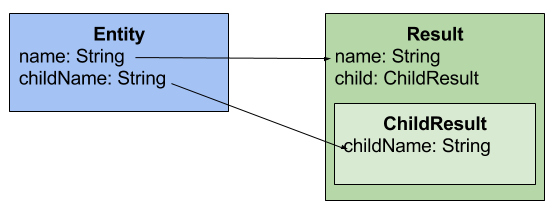
In this case you can use BeanUnwrap annotation. You want to use this annotation for example if you are mapping a form to a entity in your application. Your source object is flat and you want to convert this object to a more complex object in your application.
BeanUnwrap indicates that the fields inside the annoted field should be mapped at the same level as the annotation exist. With this annotation BeanMapper can match fields on a higher level your object structure.
public class PetForm {
    public String nickname;
    public LocalDate birthDate;
    public Pet.Sex sex;
    public String familyName;
}
public class Pet {
    public String nickname;
    public LocalDate birthDate;
    public Sex sex;
    @BeanUnwrap
    public PetType type;

    public enum Sex {
        MALE, FEMALE, NEUTRAL, HERMAPHRODITIC;
    }
}

public class PetType {
    public String type;
    public String familyName;
}
If you want your annotations at the other side you can use BeanProperty instead of BeanUnwrap. Now you can annotate the source side. Below a example, in this case BeanProperty indicates that BeanMapper should look for a field named familyName in the object PetType.
public class PetForm {
    public String nickname;
    public LocalDate birthDate;
    public Pet.Sex sex;
    @BeanProperty(name = "type.familyName")
    public String familyName;
}
PetForm petForm = new PetForm();
petForm.nickname = "Loebas";
petForm.birthDate = LocalDate.now();
petForm.sex = Pet.Sex.MALE;
petForm.familyName = "Canidae";

Pet pet = beanMapper.map(petForm, Pet.class);
assertEquals("Loebas", pet.nickname);
assertEquals(LocalDate.now(), pet.birthDate);
assertEquals(Pet.Sex.MALE, pet.sex);
assertEquals("Canidae", pet.type.familyName);
GET request - Used to get one or multiple objects
BeanMapper way & BeanMapper-Spring way
In the example below we get one pet that matches the given identifier. We convert the retrieved pet to a PetResult.class to expose the object to the outside.
@RequestMapping(value = "/{id}", method = RequestMethod.GET)
public PetResult findOne(@PathVariable Long id) {
    Pet pet = petService.findOne(id);
    return beanMapper.map(pet, PetResult.class);
}
POST request - Used to create an object
BeanMapper way
In the example below we send a PetForm through the request body of this POST request. The form is converted to a entity which is saved by the petService. The saved pet is converted to a PetResult.class to expose the object to the outside.
@RequestMapping(method = RequestMethod.POST)
public PetResult create(@RequestBody PetForm petForm) {
    Pet newPet = beanMapper.map(petForm, Pet.class);
    Pet savedPet = petService.save(newPet);
    return beanMapper.map(savedPet, PetResult.class);
}
BeanMapper-Spring way
This example uses a BeanMapper-Spring dependency to simplify REST requests. The request body contains a petForm.class just like the previous example. BeanMapper-Spring automatically converts the given form to a pet which can be saved.
@RequestMapping(method = RequestMethod.POST)
public PetResult create(@MergedForm(value = PetForm.class) Pet pet) {
    Pet createdPet = petService.save(pet);
    return beanMapper.map(createdPet, PetResult.class));
}
PUT request - Used to update an object
BeanMapper way
This method takes a path variable which contains the identifier of the pet to update. The updated pet is send through the request body. As you can see, the old pet is retrieved by the given identifier. Then the form is mapped over the old pet. Finally the merged pet is saved to the database and converted to a PetResult.class to expose it to the outside.
@RequestMapping(value = "/{id}", method = RequestMethod.PUT)
public PetResult update(@PathVariable Long id, @RequestBody PetForm petForm) {
    Pet oldPet = petService.findOne(id);
    Pet updatedPet = beanMapper.map(petForm, oldPet);
    Pet savedPet = petService.save(updatedPet);
    return beanMapper.map(savedPet, PetResult.class);
}
BeanMapper-Spring way
This example uses a BeanMapper-Spring dependency to simplify REST requests. The previous used request body and path variable are used. BeanMapper-Spring automatically merged the given form with the old entity that is retrieved by the given identifier. The given pet as argument in this update method is the merged pet which can be saved to the database.
@RequestMapping(value = "/{id}", method = RequestMethod.PUT)
public PetResult update(@MergedForm(value = PetForm.class, mergeId = "id") Pet pet) {
    Pet updatedPet = petService.save(pet);
    return beanMapper.map(updatedPet, PetResult.class);
}
PATCH request - Used to partially update an object
BeanMapper way
This method is used to partially update a pet. The given path variable contains the identifier of the old pet. The request body should contains the fields and values that must be updated in the old pet. The input is converted to a form which is mapped over the old pet. The downsize source method is used to only map the given input fields. Other fields are not updated because they are not mapped over the old pet.
@RequestMapping(value = "/{id}", method = RequestMethod.PATCH)
public PetResult partialUpdate(@PathVariable Long id, @RequestBody Map<String, Object> inputFields) {
    ObjectMapper objectMapper = new ObjectMapper();
    PetForm petForm = objectMapper.convertValue(inputFields, PetForm.class);
    Pet oldPet = petService.findOne(id);
    Pet updatedPet = beanMapper.wrapConfig()
        .downsizeSource(new ArrayList<>(inputFields.keySet()))
        .build()
        .map(petForm, oldPet);

    Pet savedPet = petService.save(updatedPet);
    return beanMapper.map(savedPet, PetResult.class);
}
BeanMapper-Spring way
This example uses a BeanMapper-Spring dependency to simplify REST requests. It is recommended to use this method instead of the previous example because of simplicity. The old pet is automaticly received by the given identifier "id". Then the given fields and values are mapped over this old pet and the merged pet is given as argument in this partialUpdate method.
After this you can do anything else with this merged pet and finally save it to the database.
@RequestMapping(value = "/{id}", method = RequestMethod.PATCH)
public PetResult partialUpdate(@MergedForm(value = PetForm.class, patch = true, mergeId = "id") Pet pet) {
    Pet savedPet = petService.save(pet);
    return beanMapper.map(savedPet, PetResult.class);
}
DELETE request - Used to delete an object
BeanMapper way & BeanMapper-Spring way
Usage of BeanMapper is not needed for deleting objects by a given identifier.
@RequestMapping(value = "/{id}", method = RequestMethod.DELETE)
public void delete(Long id) {
    addressService.delete(id);
}
@MergedForm
| Annotation | @MergedForm |
|---|---|
| Arguments |
|
| Description | Use MergedForm if you want to map an input form automaticaly to a entity. MergedForm is capable of reading an input form and mapping this into an existing/new entity. The entity is declared as parameter in our handler mapping method. |
Below a example of a partial update method. The MergedForm annotation converts the input form to a entity which can be saved.
PetForm.class is the input form in this case. The patch variable is true so only the given fields are mapped to the Pet instance. The given pet is already merged with the old existing pet instance. This can be done because mergeId is specified which contains the identifier of the old pet to merge.
@RequestMapping(value = "/{id}", method = RequestMethod.PATCH)
public PetResult partialUpdate(@MergedForm(value = PetForm.class, patch = true, mergeId = "id") Pet pet) {
    return beanMapper.map(petService.save(pet), PetResult.class);
}
Configuration
<dependency>
    <groupId>io.beanmapper</groupId>
    <artifactId>beanmapper-spring</artifactId>
    <version>${beanmapper-spring.version}</version>
</dependency>
Version is the latest version of BeanMapper spring
![]()
You can find the javadoc for BeanMapper spring here.
You can also download the latest jar and include this in your project.
Then the following argument resolver should be added.
@Override
public void addArgumentResolvers(List<HandlerMethodArgumentResolver> argumentResolvers) {
    argumentResolvers.add(new MergeFormMethodArgumentResolver(
            Collections.singletonList(mappingJackson2HttpMessageConverter()),
            beanMapper,
            applicationContext
    ));
}
Finally you can create a BeanMapper. The package prefix is necessary for mapping nested entities. All classes that exist in the package of ApplicationConfig.class are mapped recursively. A different bean unproxy method is added for removing proxy of spring classes. The id to entity converter is added for conversion from a identifier to a entity (read more).
BeanMapper beanMapper = new BeanMapperBuilder()
    .addPackagePrefix(ApplicationConfig.class)
    .setBeanUnproxy(new HibernateAwareBeanUnproxy())
    .addConverter(new IdToEntityBeanConverter(applicationContext))
    .build();
}
Id to Entity conversion
For example we have the following repository.
@Repository
public interface PetRepository extends JpaRepository<Pet, Long> {
}
Let's take a look at the following test. For configure your test, take a look at MockMvcBeanMapper.
The map function is called with a identifier as source and a Pet.class as target.
BeanMapper spring id to entity converter automatically converts the given id to a pet from the repository.
Check BeanMapper petshop to see more examples.
Long id = 1L;
Pet pet = new Pet();
pet.setNickname("Snuf");
pet.setBirthDate(LocalDate.of(2016,1,1));

new Expectations() {{
    petRepository.findOne(id);
    result = pet;
}};


Pet petFromId = mockMvcBeanMapper.getBeanMapper()
                          .map(id, Pet.class, true);
assertEquals("Snuf", petFromId.getNickname());
assertEquals(LocalDate.of(2016,1,1), petFromId.getBirthDate());
Map from page
PageableMapper.map(page, Result.class, beanMapper);
Mocked BeanMapper
Since mapping to an Entity is done at an early stage, your Spring MVC controller level tests must be configured to deal with the usage of repositories. The MockMvcBeanMapper is configured at the level of your abstract controller test, ie the class your controller tests all extend from.
The reason why you need to do this is because:
- Spring's DomainClassConverter (working on @RequestParam and @PathVariable) makes use of your repositories
- BeanMapper @MergedForm makes use of your repositories
- BeanMapper IdToEntityBeanConverter makes use of your repositories
Each of these vectors need to be addressed to set up controller tests that can deal with repositories.
Assuming you use Spring's MockMvcBuilders and assuming you have a web configuration class called WebMvcConfig, this is what you could do:
public abstract class AbstractControllerTest {

    private WebMvcConfig config = new WebMvcConfig();
    protected MockMvc webClient;
    protected MockMvcBeanMapper mockMvcBeanMapper;

    protected void initWebClient(Object controller) {

        this.mockMvcBeanMapper = new MockMvcBeanMapper(
                new FormattingConversionService(),
                Collections.singletonList(config.mappingJackson2HttpMessageConverter()),
                new ApplicationConfig().beanMapper()
        );

        this.webClient = MockMvcBuilders.standaloneSetup(controller)
                .setMessageConverters(config.mappingJackson2HttpMessageConverter())
                .setCustomArgumentResolvers(mockMvcBeanMapper.createHandlerMethodArgumentResolvers())
                .setConversionService(mockMvcBeanMapper.getConversionService())
                .build();
    }

  public BeanMapper beanMapper() {
  return mockMvcBeanMapper.getBeanMapper();
  }

  public void registerRepository(CrudRepository<? extends BaseEntity, Long> repository, Class entityClass) {
  mockMvcBeanMapper.registerRepository(repository, entityClass);
  }
  }
In your controller test, you will have to register all the repositories (presumably mock classes) that need to be added, ostensibly in a @BeforeEach method.
registerRepository(ownerRepository, Owner.class);
You can take program your mock repositories as you normally would, for example in JMockit:
new NonStrictExpectations() {{
            ownerRepository.findOne(1138L);
            result = new Owner();
            }};